
How to Skim Coat With a Roller (The Roll-and-Skim Method Pros Use)
Yes, you can skim coat with a roller, and on big walls and ceilings it's the fastest way to do it. You thin your joint compound until it rolls like heavy paint, roll it onto a section of wall, then immediately flatten it with a wide skimming blade so only a thin, even film is left behind. The roller does the loading; the blade does the finishing.
That two-tool combo is what finishers call the roll-and-skim method. Below is exactly how to do it: how thin to mix the mud, how big a section to roll, which blade width to pull with, how to keep a wet edge, and how to set up the second coat so you barely have to sand.
Why roll and skim beats the knife-and-hawk method
The traditional way to skim is to load a 12" knife or trowel from a pan or hawk and spread mud across the wall a few inches at a time. It works, but every stroke is both a loading stroke and a finishing stroke, so you're always fighting ridges, laps and uneven thickness.
Rolling splits those jobs apart:
- The roller puts mud on fast and evenly. A 9" roller with a thick nap covers a 4' x 8' section in under a minute, with far more consistent coverage than you'll get off a knife.
- The blade only has to flatten. A wide skimming blade glides over the loaded wall and scrapes it down to a thin, uniform coat. Since it isn't trying to spread mud at the same time, it leaves fewer lines.
- Less mud stays on the wall. The idea is to work compound into the surface and pull the excess off, not float a thick layer. Thinner coats mean faster drying and much less sanding.
It's the same reason production crews use it on whole-house Level 5 jobs, and it's the easiest skim technique for a careful DIYer to pick up.
Tools you'll need
- Wide skimming blade (24" to 40"): a 24" for small walls and around windows, a 32" for standard 8' walls, a 40" for ceilings and big open walls
- Small knife or blade (6" to 14"): for inside corners, around outlets, and along trim and ceiling lines
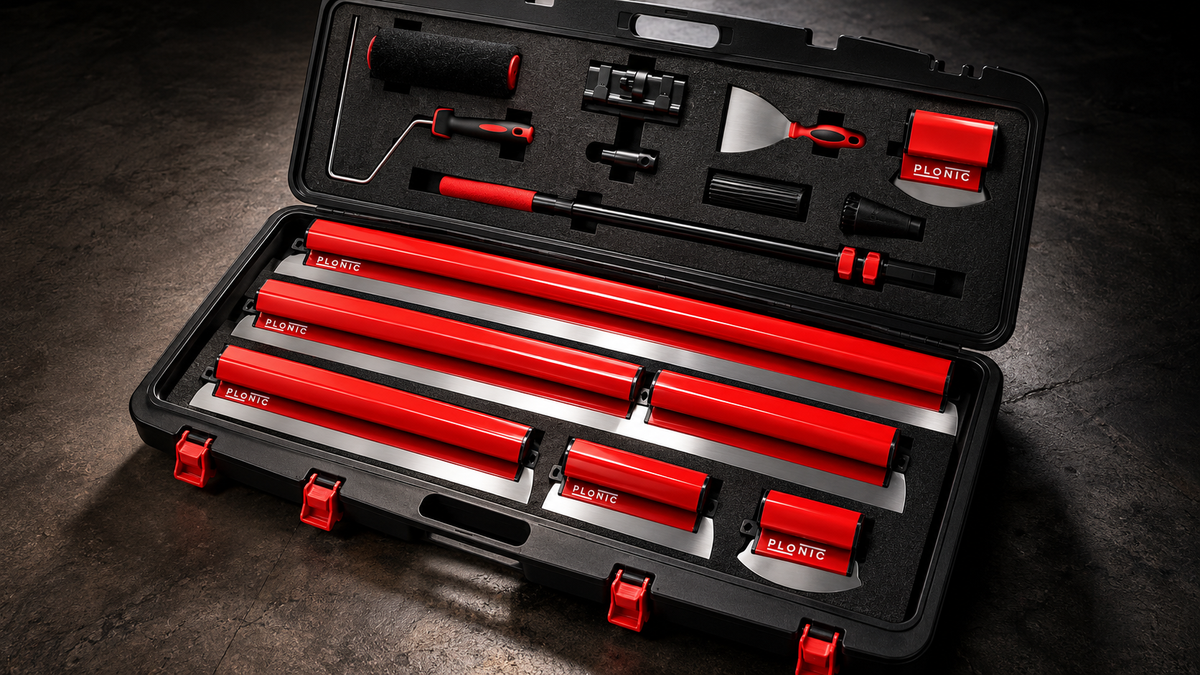
- 9" roller with a 1/2" to 3/4" nap cover: thick nap holds more mud. The PLONIC 6-Piece Kit includes a 9" paint roller; use a cover you're willing to throw away.
- Extension pole or handle: for the roller and, on ceilings or tall walls, for the blade. The 6-Piece Kit includes a 40–84" telescopic extension handle that fits every blade in the kit.
- Roller tray or 5-gallon bucket with a grid
- Mud pan: to scrape blade excess into (keep it out of your clean bucket)
- Drill with a mixing paddle
- All-purpose or lightweight joint compound, plus water for thinning
- Primer for the bare or painted wall before you start, and again before paint
- Pole sander or sanding sponges (150 to 220 grit) and a bright work light
- Drop cloths and painter's tape
Step 1: Prep and prime the wall
Roll-and-skim doesn't change the prep rules. Pull outlet covers and switch plates, tape off trim, scrape loose paint, knock down any high bumps, and clean off dust and grease. If the wall is bare drywall, previously patched, or freshly scraped, prime it first. An unprimed surface sucks water out of thin compound unevenly, which leads to dry spots, poor bond and bubbles. Our primer guide for skim-coated walls covers which primer to use before and after.
Step 2: Thin the mud for rolling
This is where most first attempts go wrong. Mud for rolling is noticeably thinner than mud you'd spread with a knife. You want it loose enough to roll on smoothly without spattering, but thick enough that it doesn't run down the wall.
- Start with a bucket of all-purpose or lightweight compound and add water a little at a time, mixing with a paddle between additions.
- Aim for something like thick yogurt or heavy pancake batter. It should fall off the paddle in a slow ribbon, not plop off in clumps.
- A quick check: on the wall, it should roll out in an even layer and stay put. If it sags or drips, it's too thin. If the roller skids and leaves bare patches, it's too thick.
- Mix until there are no lumps at all. Lumps and air bubbles show up as drag lines and pinholes under the blade.
Add water slowly. It's easy to thin mud and hard to thicken it back up. For ratios and test methods, see our mud consistency and mixing ratio guide.
Step 3: Cut in corners and edges
Before you roll a wall, use a small knife to lay compound into inside corners, around outlet boxes, and along the ceiling line and trim. A 6" or 10" blade is ideal here. You can't get a wide blade tight into a corner, so handling those strips first gives you a clean edge to pull the big blade off.
Some finishers do corners after the field instead. Either works, as long as you're not trying to finish a corner with a 32" blade.
Step 4: Roll one section at a time
Load the roller well and roll mud onto a section about 4' wide, top to bottom. On an 8' wall, that's roughly a 4' x 8' area. Don't try to roll the whole wall at once. Thin compound starts to firm up fast on a primed wall, especially in a warm, dry room, and you need it wet when the blade comes through.
- Roll in overlapping strokes to get a consistent, full coat. You want even coverage, not a thick build.
- Keep the roller off outlets and trim. You've already cut those in.
- Re-load before the roller starts running dry. A dry roller leaves a starved, patchy coat that the blade can't fix.

The kit used in this guide
PLONIC 6-Piece Skimming Blade Kit
Six 0.5 mm stainless blades (6"–40") · telescopic pole · hard case · 6 spare inserts
★ 4.9 (36 reviews)
$129.99 · Free US shipping · 2-year warranty
Shop the 6-Piece Kit →Step 5: Flatten with a wide skimming blade
As soon as a section is rolled, pull it flat with your wide blade. This is the step that makes or breaks the finish.
Pick the right width
On a standard 8' wall, a 32" skimming blade is the sweet spot: wide enough to flatten a 4' section in two or three pulls, still easy to control. A 24" blade is better for narrow walls, around windows and in bathrooms. On ceilings and large open walls, the 40" blade on a pole covers the most ground per pass. If you're unsure, our skimming blade size guide walks through each width. The PLONIC 6-Piece Skimming Blade Kit covers the whole method in one case: 6", 10" and 14" blades for corners, the 24", 32" and 40" for the field, a 9" paint roller, a 40–84" telescopic extension handle, a 7" putty knife, and 6 spare 0.5mm stainless blades for when an edge gets nicked.
Technique
- Start at the top of the section and pull the blade down in one long, steady stroke, with light, even pressure along its full width.
- Hold a fairly low angle so the blade rides on the mud and scrapes it down, rather than digging in.
- Overlap each pull by a few inches onto the previous one.
- Scrape the blade into your mud pan after every pull or two. Don't let a build-up on the blade drag back across the wall.
- Do one or two passes and move on. Going back over mud that has started to firm up drags and tears it.
Steel thickness matters here. A thin, floppy blade chatters across loaded mud and leaves ridges. A stiffer 0.5mm stainless blade holds a straight line across the whole width while still flexing enough to feather its own edges. If you're still seeing lines, check out our fixes for a skimming blade leaving streaks.
Step 6: Keep a wet edge
Once the first section is flat, roll the next 4' section, overlapping a few inches into the still-wet edge of the one you just finished. Then pull that section flat, feathering into the previous one. Keep going across the wall in a steady rhythm: roll, pull, scrape, repeat.
Laps and visible seams almost always come from letting an edge dry before the next section meets it. If the room is hot or the air is very dry, work smaller sections, or have one person roll while another follows with the blade.
Step 7: Let it dry, then knock it down
Thin coats of premixed compound often dry within several hours, but leave it overnight to be safe, especially in cool or humid conditions. It's dry when the color is even all over with no dark, damp patches.
Before the second coat, scrape off any small ridges or crumbs with a knife and give the wall a light pass with 150-grit. You're just knocking down high spots, not sanding it smooth.
Step 8: Roll and skim the second coat
Repeat the same process, but pull the blade in the other direction. If your first coat went top to bottom, pull the second one horizontally. Crossing directions fills the low spots the first coat left and averages out any blade lines.
The second coat should be thinner than the first. On a wall that started in decent shape, two coats usually gets you there. Heavy texture or badly damaged walls may need a third.
Step 9: Final sand and inspect
After the final coat dries, sand lightly with 180 to 220 grit. Then hold a bright work light close to the wall, aimed along the surface instead of straight at it. That raking light shows every ridge and low spot that paint would reveal later. Spot-fill anything you find, let it dry, touch-sand, then prime before you paint.
For the full process from bare wall to paint-ready, see How to Skim Coat a Wall Like a Pro.
Common roll-and-skim mistakes
- Mud too thick: the roller skids and the blade drags. Thin it a little.
- Mud too thin: it runs, sags and won't fill low spots. Mix in more compound.
- Rolling too far ahead: the mud firms up before the blade arrives, and you get drag marks and laps.
- Blade too narrow: skimming with a 12" knife puts you right back to dozens of lap lines per wall.
- Putting blade scrapings back in the bucket: scrapings pick up dust and dried bits that turn into scratches on the next pull.
- Skipping primer: thin rolled mud on bare or patchy surfaces dries unevenly and bubbles.
FAQ
Can you skim coat with just a roller?
Not well. A roller alone leaves a stippled, uneven texture that takes a lot of sanding to flatten. The roller's job is to load the wall. You still need a wide blade or knife right behind it to scrape the mud down to a smooth, thin coat.
What nap roller should I use for a skim coat?
A 1/2" to 3/4" nap cover is the usual choice because thicker nap holds and releases more compound. Use a cover you're happy to throw away afterward. Mud is hard to fully clean out of roller covers.
How thin should joint compound be for rolling?
Roughly the consistency of thick yogurt or heavy pancake batter. It should roll out evenly without dripping or sagging on the wall. Thin it with small additions of water and mix thoroughly between each one.
Can you roll and skim a ceiling?
Yes. It's one of the best uses of the method. Put both the roller and a wide blade on extension poles, work in smaller sections than you would on a wall, and keep your mud slightly on the thicker side so it doesn't drip. A 40" blade on a telescopic handle covers ceilings quickly; the 6-Piece Kit's 40–84" handle reaches most ceilings without scaffolding.
How many coats do you need when you roll and skim?
Two coats is typical for walls in fair condition, with the second pulled in the opposite direction. Heavily textured or damaged walls may need a third. Spot-fill anything the raking light shows before priming.
How long should a rolled skim coat dry before the next coat?
Thin coats of premixed compound often dry in several hours, but overnight is the safe rule, longer in cool or humid rooms. Wait until the color is even across the whole wall with no dark, damp spots.
Every blade, the roller and the handle for roll-and-skim
PLONIC 6-Piece Skimming Blade Kit
Six 0.5 mm stainless blades (6"–40") · telescopic pole · hard case · 6 spare inserts
★ 4.9 (36 reviews)
$129.99 · Free US shipping · 2-year warranty · 30-day returns
Shop the 6-Piece Kit →New here? Use code PLONIC10 for $10 off your first order. Just need one blade? See all sizes →